
Email me at serendipity.synth@gmail.com with any questions or comments, or if you are interested in obtaining a device.

|
The D-Thing is a device that adds significant capabilities to the DFAM (or Edge) sequencer, such as:
- MIDI integration — clocking and individual step play,
- Reset — manual, via CV or via MIDI,
- Variations in the step order — Forward, Reverse, Bounce, Odds & Evens, Shuffle, Random and Custom,
- Changing the sequence length — 1 to 8 steps (up to 16 steps for a custom step order),
- Step repeat — assign a play count of up to 8 times to any step,
- Off-grid timing — swing beat as well as arbitrary programmed shifts.
The Eurorack plus version supports most of these capabilities in a 12HP module, and adds V/Oct CV support (as an alternative to MIDI), as well as two additional outputs - Clock and Cycle. The power requirements are about 120mA on the 12V rail, and less than 20mA on the -12V rail.
Demo
The original Eurorack version of the D-Thing was an 8HP module that offered V/Oct CV no place of MIDI. This has been superseded by the D-Thing+ Euro, a 12HP module that includes nearly all the features from the standalone device, while adding V/Oct CV support, a dedicated Clock output for synchronising with other gear, and a Cycle output that fires at the start of each pattern cycle.
Review
Here is a detailed review of the Eurorack module by Braintree56.
Connections
Integrating the DFAM Thing with the DFAM and other gear is via two CV outputs, two CV inputs and a MIDI input. These are all on the right hand side of the device so as to not interfere with operating the controls.
Outputs
- Advance: connect to the ADV/CLOCK input on the DFAM so the DFAM Thing can drive the DFAM sequencer. This is the minimum required connection between the DFAM and the DFAM Thing.
- Run/Stop: optionally connect this output to the DFAM’s RUN/STOP input, so the DFAM Thing can control starting and stopping of the sequencer. However, although a high signal on the DFAM’s RUN/STOP input will start the sequencer, it will not trigger the envelopes, so to make use of this feature you will also need to mult the Advance output of the DFAM Thing to the TRIGGER in on the DFAM. If you setup so the DFAM will start on step 1, the two devices will be in sync with regard to step numbering.
- Cycle: In the D-Thing+, there is a dedicated Cycle output for this signal.
- Clock: fires once per step for syncing external gear.
Inputs
- Reset In: a high to this input will cause a reset to (the DFAM Thing’s idea of) step 1.
- Trigger In: when the clocking is external, clock steps are determined by pulses at this input.
- MIDI In: a 5-pin DIN MIDI input for MIDI note, clock & CC messages.
Controls
|
Run Press to start or stop the sequencer. Tap while running to reset to step 1. Control An encoder for selecting modes and other funtions. Rotate to select, click to apply. Tempo A potentiometer for setting the speed of the internal clock. |
Clock A switch for selecting between internal, external and MIDI clocking of the steps. Steps An encoder for step selection, in place of the individual buttons found in the standalone device. Reset A small button for rebooting the controller. |
Clocking the DFAM
Aligning the DFAM and the DFAM Thing
- On startup it is necessary to ensure that the DFAM and the DFAM Thing agree on the first step of a sequence. The easiest way to achieve this is by manually advancing the DFAM sequencer to the first step, rotating the Control encoder until Align Step 1 is displayed, and clicking.
Internal Clock
- When running in this mode, triggers are sent from the Advance output at a rate detemined by the Tempo potentiometer (and shown on the LCD).
External Clock
- When running in this mode, as triggers are received on the Trigger In input, they are passed to the Advance output.
MIDI Clock
- Timing is determined by incoming clock messages over MIDI.
- Start, Stop and Continue messages are used to control the Run state of the DFAM Thing, with Start always beginning from step 1 (according to the DFAM Thing), and Continue from whatever is the current step.
- The MIDI clock input is set to 24 clocks per beat.
- Use of this option is completely independent of the MIDI Mode sequencer option described below.
Clock Multiply and Divide
- When either Internal or MIDI clock is selected, a long press on the Steps encoder will cycle through double speed, half speed, and normal speed.
Playing the DFAM steps
Sequencer modes (patterns)
- Normal: play the steps in order, as per standard DFAM operation,
- Reverse: play the steps in reverse order,
- Bounce: first move through the steps in a forward direction, then bounce back and play them in the reverse direction,
- Odds & Evens: first play just the odd steps in a forward direction, then play just the even steps,
- Shuffle: create a random permutation of the steps, and repeat this particular permutation. A new permutation is created each time this option is selected.
- Random: play a completely random step each beat,
The number of steps (other than for a custom sequence) can be set to anything from 1 to 8 by clicking the corresponding numbered button. The length chosen is displayed at the top right of the screen.
Other modes
Multistep: enter the multistep menu (described below).
Swing: toggle the swing beat.
Microtiming: enter the microtiming menu (described below).
MIDI Mode/CV Mode
MIDI note messages (in MIDI mode) or V/Oct CVs (in CV mode) correspond to specific DFAM steps as follows:
- Any C = step 1
- Any D = step 2
- and so on for E, F, G, A, B♭ and B.
If the DFAM Thing is running, the selected clock source will determine the triggering of the note, otherwise the note will trigger only when played.
It is important to note the distinction between MIDI Mode and the MIDI Clock option. MIDI Mode is purely for using note messages to play particular steps on the DFAM sequencer. MIDI Start, Stop and Continue messages will not affect the Run state of the DFAM Thing unless the Clock switch is set to MIDI Clock.
MIDI Control
Since firmware 1.3, the following MIDI CCs are supported:
- The MIDI CC numbers 16, 17 and 18 control pattern length, pattern type and clock multiplier respectively.
- The D-Thing uses the high byte of the control value, so the changes occur at 0, 16, 32, 48 etc. This works better when controlling by a knob, and makes no difference when controlling by computer.
- MIDI CC message support is only available in MIDI clock mode.
System Configuration
Holding down the Steps encoder on startup (or after pressing reset) allows changing various device settings. Each setting is presented in order, and a selection is made by rotating and clicking the Control encoder. Currently these settings control
- You can enable or disable the screensaver, that, if enabled, actives after 5 minutes of idle time,
- You can choose between a Blue or Red colour scheme,
- Whether the internal clock should provide finer control over a smaller range, or support speeds right up to 5000bpm,
- Set the LCD orientation (needed because I changed to a new LCD component that is mounted differently)
- The PPQN for the MIDI clock response (6, 12 or 24).
- Selection of the MIDI channel (1-16 or omni)
To calibrate the V/Oct input, keep the Control encoder pressed on startup (for the original firmware version the Step encoder must be pressed as well) and hold down the asked for notes (C2 then C4). If the calibration fails, try adjusting the trimmer pot on the back of the lower board, and repeat.
Updaring the firmware
The process for updating the firmware is described in the Firmware Update guide.
New Features in Firmware 1.5
Swing, Microtiming & Multistep
Swing timing can be selected using the Control encoder, and is simply toggled on and off. When on, every second step is delayed by 1/3 of a beat.
Microtiming has its own submenu for programming and control, activated by holding down the Micro LED switch until it flashes.
Multistep also has its own submenu for programming and control, accessible in the same way using the Multi switch.
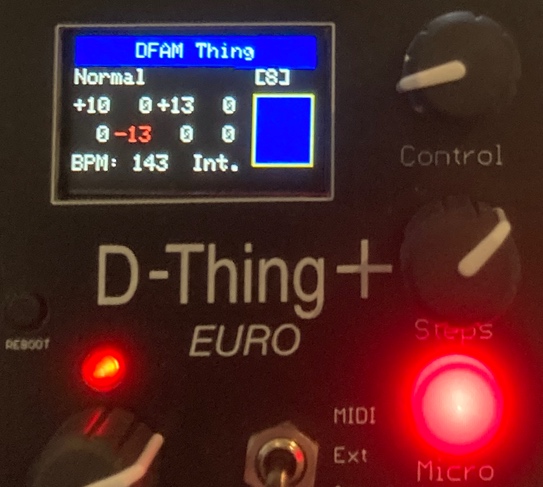
- When the switch is unlit, the microtiming or multistepping is not applied.
- When the switch is lit, the microtiming or multistepping is applied.
- When the switch is held, it will begin to flash and the display will show the relevant values for each step. Turning the Step encoder will highlight the step values in turn, and turning the control encoder will update the value. A subsequent click of the switch will end this edit mode.
- A long press on the switch when editing will set all steps to their default values.
- Clicking the control encoder while editing will return the selected value to its default (0 for microtiming and 1 for multistepping).
- Programmed values are retained across restarts.
Editing can be carried out either when the setting is active or inactive. If it is active, any changes are immediately applied.